Friday, March 4, 2011

Performance Analysis of Logs (PAL) and Server Performance Advisor (SPA) for Windows Server 2003

 If Performance Monitor Logs and Alerts is giving you an headache these tools will help you make your life easyer doing the performance analysis for you:

"Microsoft Windows Server 2003 Performance Advisor v2.0 is the latest version of Server Performance Advisor, which is a simple but robust tool that helps you diagnose the root causes of performance problems in a Microsoft Windows Server 2003 deployment. It measures the performance and use of resources by your computer to report on the parts that are stressed under workload. It does so by collecting performance data and generating comprehensive diagnostic reports that give you the data to easily analyze problems and develop corrective actions.
SPA provides several specialized reports, including a System Overview (focusing on CPU usage, Memory usage, busy files, busy TCP clients, top CPU consumers) and built-in template reports for server roles such as Active Directory, Internet Information System (IIS), DNS, Terminal Services, SQL, print spooler, and others. In fact, SPA is kind of a Performance Monitor tool that is integrated with Network Monitor and has a built-in logic that allows for easier understanding of the captured data and can help you identify clients or applications that are consuming resources on a server."

For more information click here : Petri IT Knowledgebase it is a great article. It was pointless for me to do the same article.

PAL (Performance Analysis of Logs) tool is a new and powerful tool that reads in a performance monitor counter log (any known format) and analyzes it using complex, but known thresholds (that are provided). The tool comes out-of-the-box with some predefined thresholds defined as high according to the Microsoft consulting/development but those can be adjusted to whatever you like.
The tool generates an HTML based report which graphically charts important performance counters and throws alerts when thresholds are exceeded. The thresholds are originally based on thresholds defined by the Microsoft product teams and members of Microsoft support, but continue to be expanded by this ongoing project. This tool is not a replacement of traditional performance analysis, but it automates the analysis of performance counter logs enough to save you time.

Features


  • Thresholds files for most of the major Microsoft products such as IIS, MOSS, SQL Server, BizTalk, Exchange, and Active Directory.
  • An easy to use GUI interface which makes creating batch files for the PAL.vbs script.
  • A GUI editor for creating or editing your own threshold files.
  • Creates an HTML based report for ease of copy/pasting into other applications.
  • Analyzes performance counter logs for thresholds using thresholds that change their criteria based on the computer's role or hardware specs.
 You can download it from here.PAL is greater after me because you can use it on any operating system you like.(Tested on Windows 7, Windows XP, Windows Server 2003, Windows Vista, Windows 7, Windows Server 2008, and Windows Server 2008 R2)
Note: In Windows 2003 Server sp2 and Windows 2003 Server R2 sp2 it has a little bug that you can export the Treshold Files in html format only in the root folder of the application(C:\Program Files\PAL\PAL v2.0.7).
Another thing that is problematic is that you need to change your Regional and Language Options to Standards:English(United States) & Location:United States otherwise it won't run.

Both applications are free for home and business use.

Thursday, March 3, 2011

IT FACTS

Read this article is soooo true : IT FACTS

How to start Windows Reliability and Performance Monitor with elevated privileges

To start Windows Reliability and Performance Monitor with elevated privileges
  1. Click Start-->click All Programs-->click Accessories-->right-click Command Prompt, and click Run as Administrator.
  2. Enter the user name and password of an account that is a member of the local Administrators group.
  3. At the command prompt, type perfmon.exe and press ENTER. Windows Reliability and Performance Monitor will start in the Resource View page.
Note:
You can also start Resource View in its own window by typing perfmon /res or resmon at a command prompt(in cmd).

Network Bottlenecks Performance Counters

Network Bottlenecks

Network Interface\ Bytes Total/sec - is the rate at which bytes are sent and received over each network adapter;Network Interface\Bytes Total/sec is a sum of Network Interface\Bytes Received/sec and Network Interface\Bytes Sent/sec
Network Interface\ Bytes Sent/sec -
this counter is self evident
Network Interface\ Bytes Received/sec - t
his counter is self evident
Network Interface\ Current Bandwidth -
is an estimate of the current bandwidth of the network interface in bits per second (BPS). For interfaces that do not vary in bandwidth or for those where no accurate estimation can be made, this value is the nominal bandwidth.
UDP\ Datagrams Received/sec - the rate at which UDP datagrams are delivered to UDP users
UDP\ Datagrams Sent/sec -
is the rate at which UDP datagrams are sent from the entity.
TCP\ Segments Sent/sec -
is the rate at which segments are sent, including those on current connections, but excluding those containing only retransmitted bytes
TCP\ Segments Received/sec -
is the rate at which segments are received, including those received in error. This count includes segments received on currently established connections
Server\ Bytes Total/sec - the number of bytes the server has sent to and received from the network. This value provides an overall indication of how busy the server is
Server\ Bytes Received/sec -
this counter is self evident
Server\ Bytes Transmitted/sec -
this counter is self evident
Network Interface\Output Queue Length - is the length of the output packet queue (in packets). If this is longer than two, there are delays and the bottleneck should be found and eliminated, if possible. Since the requests are queued by the Network Driver Interface Specification (NDIS) in this implementation, this will always be 0.
Network Interface\Packets Outbound Discarded -
is the number of outbound packets that were chosen to be discarded even though no errors had been detected to prevent transmission. One possible reason for discarding packets could be to free up buffer space.
Network Interface\Packets Outbound Errors -
is the number of outbound packets that could not be transmitted because of errors.You should check if someone upgraded the network driver recently.
Network Interface\Packets Received Discarded -
is the number of inbound packets that were chosen to be discarded even though no errors had been detected to prevent their delivery to a higher-layer protocol. One possible reason for discarding packets could be to free up buffer space.
Network Interface\Packets Received Errors -
is the number of inbound packets that contained errors preventing them from being deliverable to a higher-layer protocol.

Hard Disk Bottlenecks Performance Counters

Hard Disk Bottlenecks

Physical Disk\Disk Transfers/sec – watch this counter for each physical disk and if it goes above 25 disk I/Os per second then you've got poor response time for your disk
Physical Disk\Idle Time - measures the percent time that your hard disk is idle during the measurement interval, and if you see this counter fall below 20% then you've likely got read/write requests queuing up for your disk which is unable to service these requests in a timely fashion;then is time for a new faster hard disk.
PhysicalDisk\Avg. Read Queue Length Should be less than 2
PhysicalDisk\Avg. Write Queue Length Should be less than 2
PhysicalDisk\ %Disk Time more than 50% indicates a bottleneck
diskperf - is a command line tool that can be used to start disk performance counters from cmd

Note. No counters should be monitored alone you need counters of all groups processor,memory,hard disk,network interface to make a valid decision .Otherwise you might be fulled by the results of only one counter

Memory Bottlenecks Performance Counters

Memory Bottlenecks

Memory\Available MBytes - if this counter is greater than 10% of the actual RAM in your machine then you probably have more than enough RAM and don't need to worry ;set an alert to trigger if it drops below 2% of the installed RAM ;
Memory\Pages/sec - indicates the number of paging operations to disk during the measuring interval ; you should create an Perfmon Alert for this counter when number of pages per second exceeds 50 per paging disk to alert you that you need more RAM.
Memory\PageFaults/sec - is the sum of hard and soft page faults
Process\Working Set - determine which process is consuming larger and larger amounts of RAM
Memory\Cache Bytes - which measures memory leaks; a reboot solves memory leakage into the non-paged pool;
Memory\Committed Bytes - If the value for committed bytes is greater than physical memory, then more RAM would help ;
Memory\Transition Faults/sec - which measures how often recently trimmed page on the standby
list are re-referenced ; if this counter value increases over time you have insufficient RAM
Page File\Usage (_Total) - create an alerter to notify if it exceeds 70.Then is the case to move the page file to another drive or split it across drives.

Hardware Bottlenecks Performance Counters

Hardware Bottlenecks

System\Context Switches/sec -measures how frequently the processor has to switch from user- to kernel-mode to handle a request from a thread running in user mode ; the heavier the workload running on your machine, the higher this counter will generally be, but over long term the value of this counter should remain fairly constant ;you should create a baseline and then create a Perfomance Monitor Alert for this counter.
Processor\Interrupts/sec (_Total) -if this counter with the above counter suddenly start increasing
it may be an indicating of a malfunctioning device ;over 40% you have a driver or hardware problem
Processor\Privileged Time (_Total) – if this counter increases too then you might have problemems with a device driver.

System Availability and Processor Performance Counters

System Avalilability

System\System Up Time - how many Seconds passed since your server's last restart
Process\Elapsed Time – time since winlogon process has started;monitor processes associated with specific applications and services to monitor the availability of these applications and services

Processor Bottlenecks

Processor\ Processor Time (_Total) - measures the total utilization of your processor by all running processes ;if you have a server with multiple processor then this counter measures the average processor utilization of your machine ;50%-healthy,50%-90% monitor or caution;over 91% critical the processor can't handle it.
Process\Processor Time – see what processes utilize most of the processors power;use all instances when you want to detect which process consumes most processor time;(Process Store – Excange,Process Inetinfo – IIS)
Processor\Privileged Time (_Total) - processor utilization for kernel processes;the server is underpowered;constantly over 75% indicates a bottleneck
Processor\User Time (_Total) - show processor utilization for user-mode processes ;if this counter is high you have to many roles installed on this server
System\Processor Queue Length - how many threads are waiting for execution ; if you have multiple roles installed and the counter value is over 8 you have a problem;if you have multiple processors or cores this number will be divided amongs them;then the queue lenght per processor/core must not be over 2;

How do I enable the NUM LOCK key for the logon screen in Windows 7?

In Windows 7 NUM LOCK is disabled by defaul at logon.To enable NUM LOCK before a user logs on, follow these steps:

Step 1 - Run Registry Editor.Open Run(windows key+R or Start-->AllPrograms--> Accessories-->Run) and type regedit.

Step 2 - find the following registry key: HKEY_USERS\.Default\Control Panel\Keyboard.

Step 3 - Change the value for InitialKeyboardIndicators from 2147483648(you may have value 0 here) to 2.
Done.Reboot your PC and presto!!Num Lock ON at welcome screen.

Post update 14.7.2011 if you install windows 7 sp1 the num lock is active at startup  by default

Friday, February 25, 2011

How to clear corrupted Messages from the Hub or Edge Submission Queues

If you have ever tried to delete messages stuck in an overflowing Exchange 2007 submission queue you will notice that you can not simply delete the messages as you can for other queues.
In order to clear the Exchange 2007 submission queue you will have to create a new queue database from scratch. This may cause some mail loss but will allow you to get your mail queues functioning properly again.
First you need to be member of the apropriate Security Groups: Local Administrator for Edge Transport Server and Local Administrator+Server Administrator for Hub Transport Server.

Step 1 Stop the Microsoft Exchange Transport service like this:
Computer Management -->Services-->Locate and stop the Microsoft Exchange Transport Service
or from Exchange Managemet Shell type: Stop-Service MSExchangeTransport

Step 2 Navigate to the Queue folder location. By default the folder is located here:
C:\Program Files\Microsoft\Exchange Server\Transport Roles\Data\
Here you will find a folder named Queue .Rename this folder give it a name like Queue2.Create a new empty folder named Queue.

Step3 start the Microsoft Exchange Transport service like this:
Computer Management -->Services-->Locate and start the Microsoft Exchange Transport Service
or from Exchange Managemet Shell type: Start-Service MSExchangeTransport
Confirm mail flows both inbound and out of your server.(In other words the messages from the queues are disappearing.)

Done.How this pelped you :)

Thursday, February 24, 2011

How to configure Exchange 2007 Hub Transport role to receive mail from the Internet

First step is to modify the default receive connector in Exchange Management Console:

Exchange Management Console --> Severs Configuration-->Hub Transport-->Receive Connectors-->Default Your_server_name-->Propreties-->Permission Groups check Anonymus Users

The "Default" receive connector on Hub is configured for other Exchange servers to authenticate, but it does not accept anonymous e-mail by default.See Image Bellow
 This step you can't do from the Exchange Management Shell because the command Set-ReceiveConnector parameter -PermissionGroups takes only one value.In other words you can specify only a single group like AnonymousUsers but you need the other groups to remain checked (ExchangeUsers, ExchangeServers, ExchangeLegacyServers).

Second Step configure the send connector to send messages to the internet:
Exchange Management Console -->Organization Configuration -->Hub Transport-->New Send Connector: type the name of the connector and choose the Internet type see image below:
In order for all outbound mail to pass through the connector, the address space of the connector should be * and the type SMTP.See image below:
The network tab allows you to specify whether you'll use a smart host  to relay your messages, or if you'll handle the delivery yourself (using DNS).The source server specifies which Exchange server or servers in your organization will be responsible for sending Internet email.
Note: For Romania RDS ISP users SMTP port 25 is blocked you have to use your ISP smart host to relay messages to the internet.RDS's smart host fully qualyfied name is smtp.rdslink.ro.
See image below:
 If you want to know more about how to test if port 25 is blocked by your ISP read this article is awsome http://www.postcastserver.com/help/Port_25_Blocking.aspx

Configure the smart host authentication to none.See image below:

 Then Next-->New-->Finish


Or to configure the send connector from the Exchange Management Shell type:
new-SendConnector -Name 'to internet' -Usage 'Internet' -AddressSpaces 'SMTP:*;1' -DNSRoutingEnabled $false -SmartHosts 'smtp.rdslink.ro' -SmartHostAuthMechanism 'None' -UseExternalDNSServersEnabled $true -SourceTransportServers 'SERV642'


Third Step if you do not want to be bombarded with spam you should enable the antispam filters on the hub transport servers like this:
Open the Exchange Management Shell and type:
cd "C:\Program Files\Microsoft\Exchange Server\Scripts"
after that type: Install-AntiSpamAgents.ps1 
now restart the transport service: restart-service msexchangetransport
Once you complete these steps, you will see the Anti-spam tab enabled in the Exchange Management Console.See Image Below:
And of course configure the antispam agents but that is another topic.

Forth Step By default, your new Exchange 2007 servers will only accept e-mail destined to the Windows domain that the server was a member of. In order to accept email destined to your external SMTP domain, you will probably need to create a new Accepted Domain:
Open the Exchange Management Shell and type:
New-AcceptedDomain -DomainName xyz.com -Name xyz
or 
Exchange Management Console -->Organization Configuration -->Hub Transport--&gt--> then select Accepted Domains tab--> New Accepted Domain (Choose Authoritative Domain)

Notes:Because your server is sitting directly on the Internet, you may want to change the advertised FQDN that is sent in HELO/EHLO commands in SMTP. The user interfaces for both send and receive connectors allows you to configure this.
Because you will not be using Edge Server, you have no need for the Microsoft Exchange EdgeSync service. You can set this service to disabled to prevent it from starting and using system resources.
You can do this from Power Shell or Exchange Management Shell .Type this:

Set-Service MSExchangeEdgeSync -startupType Disabled
Stop-Service MSExchangeEdgeSync


I think almost everyone knows how to disable and stop a service from Computer Management-->Services-->Microsoft Exchange EdgeSync (disable and stop)

Final Suggestions - make sure that your DNS  MX record is correct and  that your firewall is letting the connection inbound to port 25.(The easiest method if you already have a mail server is to either reuse that server's IP, or update the firewall rule to point to the new Exchange 2007 server's internal IP.)

Venus Project - Paradise or Oblivion

Friday, December 17, 2010

How to Register Exchange 2007/2010 Server Roles with Security Configuration Wizard(SCW)

The Security Configuration Wizard(SCW) automates security best practices to reduce the attack surface for a server. The Exchange Server role extensions enable you to use the Security Configuration Wizard(SCW) to create a security policy that is specific to the functionality that is required for each

Microsoft Exchange server role. The extensions are provided with Exchange 2007 and must be registered before you can create a custom security policy.

Step 1. Install an Exchange server role\roles.Install the Security Configuration Wizard(SCW) you will find it in Control Panel-->Add/Remove Programs-->Add/Remove Windows Components-->select Security Configuration Wizard and click next

Note:You must perform the registration procedure on each Exchange 2007 server to which you want to apply an  Security Configuration Wizard security policy.

Step 2.To do this step you must be memeber of Local Administrators on the Exchange Server you want to apply the security policy and Exchange Server Administrator .On a server with the Edge Transport Role installed you need to be member of Local Administrators.open cmd and type:

scwcmd register /kbname:Ex2007KB /kbfile:"C:\Program Files\
Microsoft\Exchange Server\scripts\Exchange2007.xml"


Note:the command above works on Windows Server 2003-based or Windows Server 2003 
R2-based computer that is running the Mailbox, Hub Transport, Unified Messaging, or Client Access server role.

scwcmd register /kbname:Ex2007EdgeKB /kbfile:"C:\Program Files\
Microsoft\Exchange Server\scripts\Exchange2007Edge.xml"
 
Note:the command above works on Windows Server 2003-based or Windows Server 2003 R2-based computer that is running Edge Transport Server role.

Step 3. To verify that the command has completed successfully  examine the SCWRegistrar_log.xml  file that is located in the C:\Windows\Security\Msscw\Logs folder

Step2 For Windows Server 2008-based computer that is running the Mailbox, Hub Transport, Unified Messaging, or Client Access server role is like this:

scwcmd register /kbname:Ex2007KB /kbfile:C:\Program Files\
 Microsoft\Exchange Server\scripts\Exchange2007_WinSrv2008.xml"

For Windows Server 2008-based computer that is running the Edge Transport server role is like this:

scwcmd register /kbname:Ex2007EdgeKB /kbfile:"C:\Program Files\ 
Microsoft\Exchange Server\scripts\Exchange2007Edge_WinSrv2008.xml"

Note:Step1. and Step3 are the same as for Server 2003-based or Windows Server 2003 R2-based computers

Hope this helped you.Thanks for reading.

Thursday, December 16, 2010

How to enable Active Directory Schema Management Console

Step1. Open Run and type : regsvr32 schmmgmt.dll

Note: If you do not register the schema dll it will not appear in mmc Add/Remove Snap-in
Step2. Open run and type: mmc
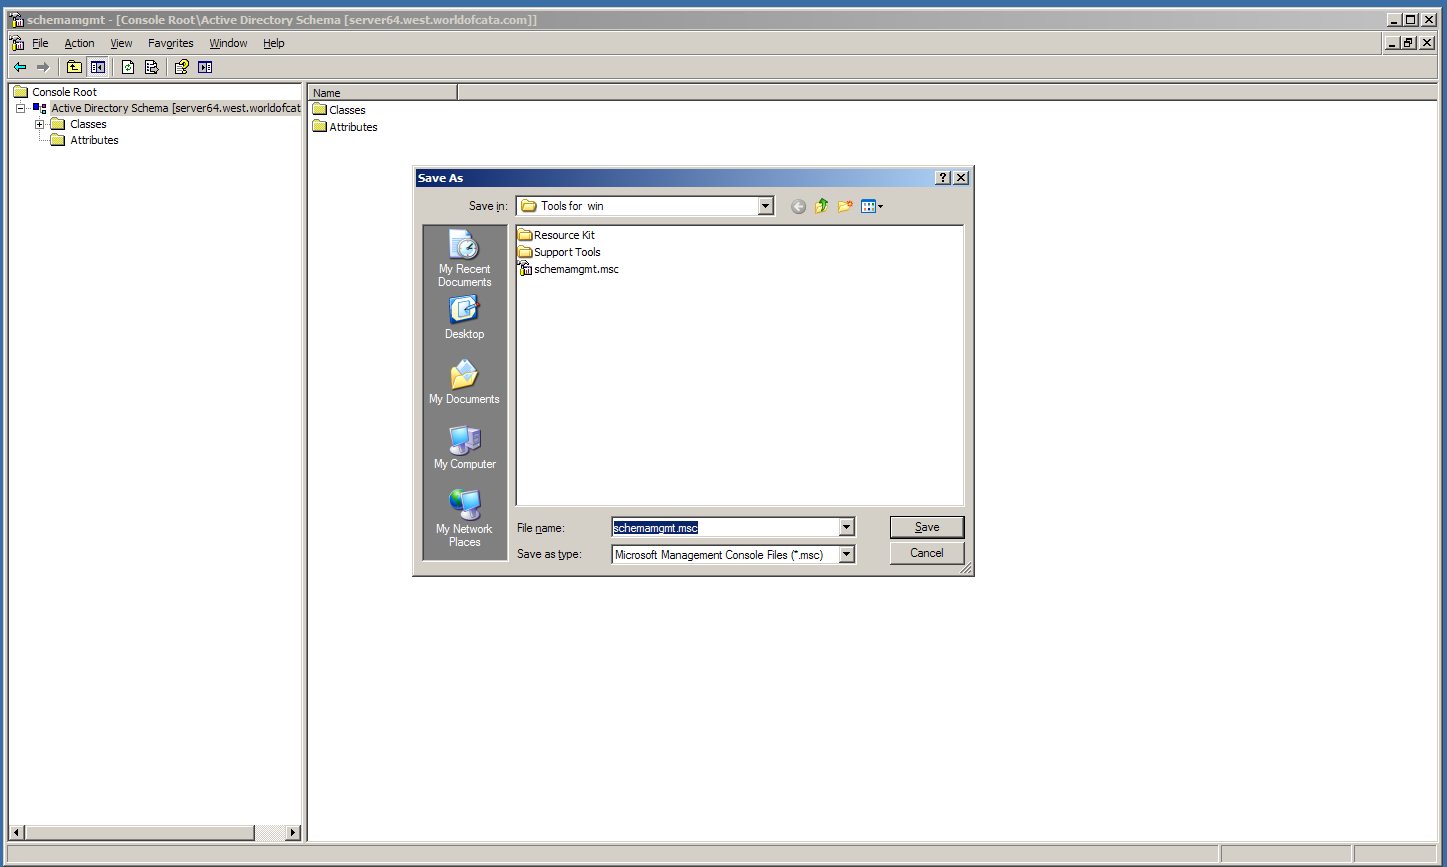
Step3. In Management Console go to File-->Add/Remove Snap-in-->select Active Directory Schema and click add then click close then click ok


Step4. File -->Save--> call it schemamgmt or whatever and save it in C:\Windows\System32 folder.(beacause that folder has the Path variable set so you can launch the mmc console without typeing the whole path)

Congratulations now when you open run and type schemamgmt.msc it will launch your Active Directory Schema Management Console.


Hope this helped you.Thanks for reading

Wednesday, December 15, 2010

How to Install first Exchange 2007 Server from the command line

Before you install Exchange Server 2007/2010 verify that you have Windows Server 2003 at least sp1 or Windows Server 2003 R2 with sp1.You have installed MMC 3.0(Microsoft Management Console), .Net Frameworks 2.0 and Windows Power Shell.The SMTP and NNTP services must NOT be installed.
Note:
For Mailbox Server Role you need IIS 6.0 installed and COM+Access and World Wide Service components active + the things needed for a tipical install.
For Client Access Server Role you need  IIS 6.0 installed and World Wide Service,RPC over HTTP and Asp.NET 2.0  components active + the things needed for a tipical install.
For Unified Messaging Server Role you need Microsoft Windows Media Encoder,Microsoft Windows Media Audio Voice codec,Microsoft Core XML Services (MSXML 6.0)+ the things needed for a tipical install.
For Hub Transport role you need nothing more.
For Edge Transport you need Active Directory Application Mode (ADAM) installed on a stand alone server which is not part of the domain and is located in a dmz or perimeter network.

1.Open cmd and navigate where your Exchange setup folder is or if you have it on cd navigate from cmd in that folder.
2.now type: setup /PrepareAD
3.setup /mode:install /roles:MailBox /OrganizationName exmydomainname
Note:If you want to specify more roles type like this:
setup /mode:install /roles:MailBox,ClientAccess,HubTransport,ManagementTools  /OrganizationName exmydomainname
Note: the prepare AD command must be run in the same site with your domain's Schema Master Server and you must be a member of Enterprise Administrators and Schema Administartors Active Directory groups to run this commands.If there are errors verify your Event Viewer -> Application Log to view them.

Hope this helped you.Thanks for reading.

I quit my job finally I can take no more

I'm so sick of working for people who demand more and pay less!! If you want to give us more tasks then don't cut our salaryes give us moore money dumb ass! It's to much to ask to have a good paid job these days in Romania what the f*$#k ??
I can't live with what you are giving me!Well I guess it's time to move one.
Please if someone knows some good jobs  please tell me.In Romania things aren't going so well so I'm really interested in leaving this country.A  good IT job in Canada,Australia or England would be so cool if I could find... I have 2 college degrees in IT, and I have a Microsoft System Administrator(MCSA)and a MCTS.

Thanks for reading my lament :) It's time to update my CV and go job hunting.

Tuesday, September 21, 2010

Nessus Install the easy way

1. Download nessus from here.
2.If you are a home user you can register for free to get an update code
3.I'm on Linux so i just double clicked the package and it installed  .
4.Activate your account, simply execute the following command :

sudo /opt/nessus/bin/nessus-fetch --register 8BE6-8F7C-8032-5805-D15B(your code here)

5.Add a new administrator user

sudo /opt/nessus/sbin/nessus-adduser (it will ask for a user name and a password )

6.Login from browser - type: https://localhost:8834/

7.If it doesn't work try restarting the nessus service some times it is blocked after installation like this:

sudo service nessusd restart

8.To check for updates manually try this:

sudo /opt/nessus/sbin/nessus-update-plugins 

9.How to configure nessus for advanced options.In there you will find the options and a brief explanation.
sudo /opt/nessus/etc/nessus/nessusd.conf 

jacksum is a better utility for file integrity cheking

If you want to verify file download integrity you must install jacksum. 
Jacksum supports 58 popular standard algorithms (Adler32, BSD sum, Bzip2's CRC-32, POSIX cksum, CRC-8, CRC-16, CRC-24, CRC-32 (FCS-32), CRC-64, ELF-32, eMule/eDonkey, FCS-16, GOST R 34.11-94, HAS-160, HAVAL (3/4/5 passes, 128/160/192/224/256 bits), MD2, MD4, MD5, MPEG-2's CRC-32, RIPEMD-128, RIPEMD-160, RIPEMD-256, RIPEMD-320, SHA-0, SHA-1, SHA-224, SHA-256, SHA-384, SHA-512, Tiger-128, Tiger-160, Tiger, Tiger2, Tiger Tree Hash, Tiger2 Tree Hash, Unix System V sum, sum8, sum16, sum24, sum32, Whirlpool-0, Whirlpool-1, Whirlpool and xor8). 

How to use:

1.sudo aptitude install jacksum
2.jacksum -a md5 Nessus-4.2.2-ubuntu910_i386.deb -this command lists the md5 checksum hash
3. Or for sha1 like this jacksum -a sha1 Nessus-4.2.2-ubuntu910_i386.deb